

Showing posts with label original gem. Show all posts

Wednesday, April 21, 2010

A Spring Tote Bag from some scraps

Sometimes I've just gotta sew. It is my stress-release- well that and exercise. (But exercise these days is also a chore-in that I am trying to lose some major weight.)  But there is something about sewing or crafting that does me a lot of good. I'm sure it would be similar to most people's "girls night out" or for some reading a good book, or going to the spa. But I don't really have any girl's night outs, I read until I fall asleep, and  I can't afford to go to any spa. So I have dates with my sewing machine. And we had one until midnight last night.
I wanted to post a tute for ya' all, but I was too tired. sorry. Those things take lots of thought and work.  But if you really want the 411 on this, let me know, because I have plans to make another one soon. -- and it really is easy to make! Plus isn't a big printed tote the thing this season? If it isn't maybe I need to get out more :)


Basically I just cut squares and sewed-measuring of course. I purchased these scraps from my friend's store for about $3. She had a great sale in March, and I got some beautiful scraps. :) I love fabric scraps. 
 I bought a piece of gray fabric for a few dollars for the lining. Total cost: $6- not counting the interfacing and thread that I already had on hand. It took me about 4 hours from start to finish to make.
So let me know if you want more details, and I'll be happy to share a little tute action with you.
On the home-front, the baby is still sick, and I need to get my kids out for some fresh air!
Have a great day!  Project Runway finale is on tomorrow night-as in Thursday! That show...makes me really want to sew. :)
Thanks for reading!


post signature

Monday, March 29, 2010

Don't Eat Pete {in Easter Peep style}

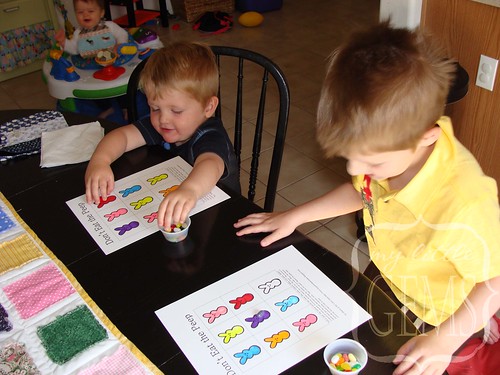
Last night I was doing the dishes, and I suddenly thought of this idea. It probably came because of all the cute Peep crafts out there. Anyway, needless to say the dishes never got finished, and I am very tired. :) But when an idea hits, sometimes other stuff has to wait, right?  My boys LOVED playing this and we came up with some variations on it too.
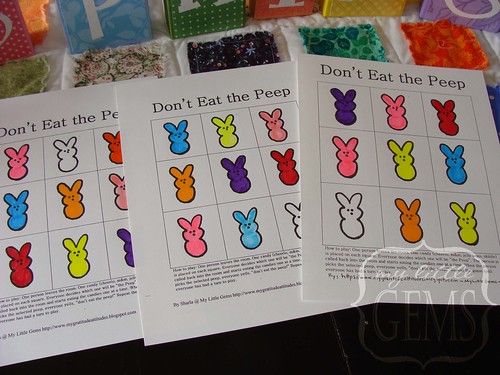
This is a really fun and easy game- and I made up a download for you (below)- all in the name of the Peep.☻


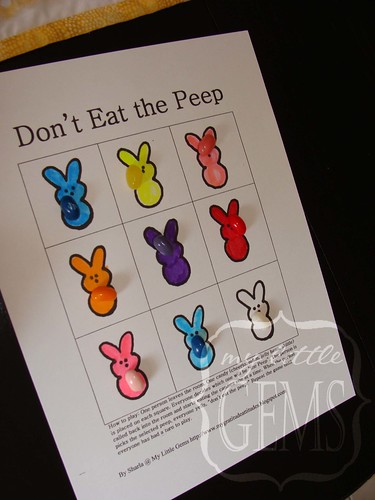
If you haven't played Don't Eat Pete, let me quickly explain it. You put a candy (we used jelly beans) or other edible item-just as a Cheerio, on each picture. One person leaves the room, and the rest of the group picks one to be the "peep". When the person comes back in the room, they start eating one at a time. (My son just took them off because he did not like the jelly beans-and you can do that too.) When the person picks the "peep" that the group picked, you yell "Don't eat the peep!" And everyone has a good laugh. You repeat until everyone has had a turn.


NOTE: if you have small children that are startled by loud noises, this game could scare them. It depends on the child. My children (not the baby-it scared him) were fine, but I have played this with older children, and they did not like the yelling part. Just letting you know- so you don't have crying children from this game. :)

A FEW VARIATIONS:
We did COLOR BINGO. I made several cards, and as I called out a color, the kids would put a candy on that colored peep.
We also did COLOR MATCHING- matching the colored jelly bean to the peep color.
AND you could also print these out on colored card stock and number them and do the same two games but with numbers or ABC's.

Want to play this game with your family? Click below to download your copy and have fun playing Don't Eat the Peep! I made it in a word document file and it is white so you can color it or print it on colored card stock. The ones above I colored with Crayola markers and highlighter markers.


Download your Don't Eat the Peep game board here.


Can you please leave me a comment if you like this and will be using it? I spent way too much time on this post and some comment love would be good for me today :)
And now I have exercise to do, dishes to do, laundry to fold, etc. etc. But at least we have a fun Easter game to play :)
Happy Easter Week! Hope it is a fun one!

post signature

Thursday, February 4, 2010

Make a Chore Chart from a Place mat

So if you read the post right below this one, you can probably guess that a "Chore Chart" is desperately needed in this house. {Although if you are a mom of young kids, you know that you do most of the "chores" anyway.}
Well no more in our house! {yes, insert laughter here}
My four-year-old son wanted a chore chart. {yes, we'll see how long that lasts...} And I wanted to make stuff out of dollar store place mats. So we both win. ☻
HOW TO MAKE A CHORE CHART FROM A PLACE MAT:
1. Using the backside of the place mat {all these crafts are the same type of place mat from the Dollar Tree}
I simply sewed some pockets. I used a pocket off of some old toddler jeans, and cut the others to match from fabric I had in my stash. Pockets make this chore chart very versatile. You can change and update the jobs/chores anytime.
2. I used my favorite "Wonder Under" to attach the numbers to the front of the pockets.
3. A cut up plastic tape measure makes the handle. I also sewed a strip of the tape measure along the bottom, sewing at every inch, so that it made little loops. This is where the "stars" go when all the chores are done.
4. This is light enough that it can be hung with some magnet clips on the refrigerator, or it can be hung up on the corner of a chair, a hook, anywhere you want to put it so that your child will see it.

5. The job charts are chipboard, with modge-podge paper on each side, and hot-glued to a Popsicle stick. When one job is complete, the card flips over to say "done!". I plan to replace these or update these, but we needed a job chart now- because mommy is tired of doing all the chores and...I have a very anxious 4-year-old who wants one.
6. The stars are for when all the jobs are complete for that day. I cut a star from felt and hot-glued it to a paperclip. The paper clips clip right onto the yellow tape measure loops at the bottom.
7. WOW- looks like someone did all their jobs! The little denim pocket (from an old pair of jeans) at the end of the tape measure is to store all the stars.  When he completes his little chores, I told him he can have a quarter. When he gets 4 quarters, we'll go to The Dollar Tree and buy more place mats. Just kidding. He can buy a dollar toy. Let's hope this works. He is excited to do chores, and now he has a super cute chore chart. Maybe he'll want to do chores all day! ha!
I'm thinking maybe I need to make another one for potty training my 2 year old....except I'm not ready to potty train him....yet. But He is totally ready.
There are some super cute chore charts on Tip Junkie. HERE is the link for more ideas for Chore Charts.
I have one more fun place mat craft coming up soon!

Thursday, January 14, 2010

Burlap ABC/Number Magnets {Tutorial}


I am loving all things ABC lately. ☻ Everyone needs some cute ABC magnets for their fridge/magnet board ..so I came up with these to use up some burlap scraps and magnets I bought over a year ago.☻ These are super easy, super cute, and super fun...{at least I think so}...and if you love burlap, ABC's and leaving love notes and messages... perhaps you will love these too. Here is the 411 on making a set for your magnet board so you can leave messages like this:


SUPPLIES FOR BURLAP ABC MAGNETS:
Foam or rubber stamps
Acrylic craft paint
Sponge brush to apply paint
Burlap (of course)
Button magnets
Scissors
Double sided Fusible Webbing (I used Steam-to-Seam)
Fabric scraps
Iron and a glue gun

If you are new to working with burlap, here is a great post with great tips on using the stuff. First apply paint to your stamp and stamp it on the burlap. After it is dry, cut it out in the desired shape. (I wasn't really exact about mine, but do what works for you.)
Using your double-sided fusible webbing, apply that to the back side of the burlap and fabric to the other side. Iron according to the directions on the fusible webbing.


Hot glue your button magnet on the back and when that is dry you are done. You could use a different type of magnet, but I liked the 3-D effect when it is on the magnet board, from using this type of magnet.
Now you are done! If you make a few of the more common letters, you can use these all year these all year to display messages to your family or loved ones. Here are a few Valentine's messages:


How about using these to spell "Happy Birthday" or "Have a Great Day" etc. etc. So many possiblities...and the best part is -they don't break. (I have lots of breakable magnets....)

I am loving these! I have an idea for something similar, so if it works I'll let you know. If you like this and make a set, please link to this post- as I would LOVE to see your version! {And let me know if you have questions too..} Happy Crafting!

Saturday, January 2, 2010

Favorite "Gems" {a.k.a. posts} from 2009

Because "everyone is doing it"- ha ha☻- I thought I would post my favorite and some of your favorite little gems from this here blog.☻ Enjoy and here's to a creative 2010!


originally posted January 2009


originally posted February 2009


originally posted April 2009


originally posted May 2009


originally posted March 2009


originally posted August 2009


originally posted October 2009


originally posted first in June 2009 and then September 2009
(probably the most popular post found here :))

just posted December 2009 with Tutorial/template coming this month, January 2010

AND NOW... I just want to say THANK YOU to everyone out there who encourages me, supports me, and reads this thing. :) It really means a lot to me. Thank you thank you! More fun to come for 2010!
Happy New Year everyone!

Friday, November 27, 2009

Burlap Word Ornaments {Tutorial}


Hope you had a wonderful Thanksgiving, and a Happy Black Friday with lots of good finds. I am happy to report, I did not step foot in a store today (well my husband did...) and instead I made lots of little crafty projects. ☻ Here is a fun and simple one that I really am loving...
Around Halloween, I picked up some burlap to make some Halloween crafts, and lo and behold, I never got around to it. So today I had a great idea to make ornaments out of it. Here is a tutorial so you can make some too if you like. And the best part-- no sewing- ☻ super easy!

Burlap Word Ornaments:
You need:
burlap
foam rubber stamps with letters
acrylic paint
sponge brush
twine
Christmas fabric scraps
stich witchery, Wonder Under, or other fusible webbing product
scissors, iron

Decide what words you would like. Simply paint the stamp with the sponge brush and stamp on the burlap. Don't get too much paint on the stamp. ☻

Next, to get the frayed edge on the burlap, just pull some of the threads/twines out. Very easy. When you cut out your word, leave lots of extra on the sides for this. You don't even have to cut it out straight, because when you pull the threads/twines, it will straighten up. Trim off the sides if needed.
Next, you are going to cut a piece of fabric to match the size, and some stitch witchery (like Wonder Under but on a roll-used to hem skirts,etc. without sewing) and cut a piece of twine.

Next you just layer it all together and iron. The important thing here is to put a layer of your fusible webbing, then your twine, the another layer of webbing. Otherwise, the twine will not stay put, but will come out.

Iron it all together. Make sure the twine is in nice and tight.


Hang on your tree and enjoy your simple, easy, super cute, trendy, and thrifty new Christmas ornaments!
I am making lots of these-I think they are so cute! - they would make really cute neighbor gifts--if you are my neighbor and are reading this....oops...maybe you'll get one. ☻

Tuesday, November 3, 2009

Make a Magnetic Advent Calendar


Last year I spent a lot of time making these. I still have a few left- if you would like one or the materials/kits to make one- let me know. ☻  I sold and gave a way many an advent calendar last year and it sort of burned me out. This year I have way too many crafts on the brain to make these again. Besides,  this year these are out there in blog land.  (The circle idea actually was seen in a vinyl lettering catalog but it was a bit different and obviously lots of people saw the same thing I did.☻ )
 A friend and I came up with the tree one- using our incredible brain power. ☻  hee hee-not like we haven't seen a tree advent before.... :)   (two brains are always better than one-right?)
Anyway- Here is the lowdown on how to do this on your very own:
You need a cookie sheet, or magnetic board. I'm not going to tell you to spray paint a cookie sheet- as I did, because it can be a pain. in. the. you know what. BUT you can buy magnetic spray paint and use wood, or purchase a magnetic board or material from a hardware store, and there you go.
Next you need vinyl numbers, or stickers, or some way to put on the lovely numbers to count down.
To go with that, you need a cute Christmas magnet.
AND last, you need a way to display it. I just hot-glued ribbon on the back.
OK there is one little advent calendar you can make pretty fast.
What kind of advents are you using this year? 
Is it really Christmas already?

Monday, November 2, 2009

Car Cozie or Car Cozy

Thanks to Kari at UCreate, I have had several requests for Car Cozies. ☻ So here is the status:
I will sell car cozies for 18.95. I will sell the kit to make our own, with designer car fabric, just contact me. Both will be avaliable through my etsy shop  sometime this week.
Please contact me through my etsy shop (convo me) and I will get in touch with you to fulfill your requests.  If you already purchased one, it  is on its way. If you would like one, I will  get more in my shop this week! Please check back soon. Thank you! Thank you!! ☻ ☻ ☻

Monday, October 5, 2009

Crafting with Kids: Pipecleaner Pumpkins

While sitting in the hospital, the last 2 weeks, I came up this. This is a fun easy quick craft that kids can do, or you can do with your kids: Pipecleaner Pumpkins! We think these are pretty cute, and my four-year old really liked them. ☻ Here is a step-by-step in photos:
First you need pipecleaners- 5 orange, one green, and one brown. You also need some scissors.


Using one as your "main" pipecleaner, attach all the others to the middle by wrapping them around right in the middle.
Start like this:
OK so you just make an octopus looking thing- but we aren't done yet ☻
Now it is starting to look more like a carrot...☻
Just get the top ends all nice and even-folding them and wrapping them around each other.
Where the orange is on top is going to be our brown stem.
The green vine/leaf is wrapped just below.
At this point, it really does look like a carrot...until you spread all the sides out:
Cute! This is fun for older kids to do (meaning older than pre-school age), or younger kids (meaning pre-school age) can do this with a little supervision. Pipecleaners are made of wire, so the ends can be sharp, so watch those little fingers!
We made a little mobile out of these and hung it up. It would also make a cute little garland that could be hung in front of a window. Have fun crafting with your little pumpkins!

Monday, September 7, 2009

Car Cozie Tutorial (a.k.a. Car Cozy)

MyFreeCopyright.com Registered & Protected

It's the post many of you have been waiting for :) I had to work out lots of things w/ this and so thanks for your patience. AS ALWAYS- this is for personal use only☻ which means no selling/redistribution, entering contests, etc. (In case you are wondering- I spelled it cozie instead of cozy...just trying to be original-since I have not seen this anywhere-and I have looked ☻) I am selling some in my etsy shop, if you would rather buy one. (more items coming soon) AND...I will sell you a kit too-with everything cut and ready to go. With this post, I am also doing a little give-a-way! Details at the end of post ☻


Let's Get Started:


Here is what you need :
ALL SEAM ALLOWANCES ARE 1/4 inch.

Step one: prepare the road piece


1. Iron the interfacing onto the back (wrong side) of the black fabric. I used flannel, or  you could cotton quilting fabric for the road. You could also use felt, but I really liked the flannel and cotton look and feel. Felt doesn't seem to wash as well, if you plan on washing this.


2. Next cut your 10 inch strip of yellow felt into 4 equal pieces. Cut your Wonder Under to match these pieces. Space evenly on the black fabric- the right side-(not the interfacing side) down the middle of the fabric. TIP: To get your pieces on evenly and easily, iron your road piece in 1/2 lengthwise to make a crease. Place the road lines right on the crease and they will be in the middle of the road now. ☻


With Wonder Under you don't have to sew. You can iron it in between the road and the yellow fabric, and it will fuse the two fabrics together. You can sew around the yellow lines too, if you want to reinforce them. Either way- your choice- but the Wonder Under really does keep it on.


Once your road is finished, set it aside for now.


Step Two: Prepare the pocket piece


(sorry different fabric here:))

1. The car piece that is 18 1/2 inches by 9 inches will be your pocket. Fold it in 1/2 and iron. Your pocket front will now be double thickness with the fold at the top of the pocket.


2. Place this piece with your contrasting fabric, lining up the raw edges. (The road will be sewn on the opposite edge of this contrasting fabric piece. )


3. Mark and pin the pocket piece every 3 inches, leaving an extra 1/4 inch on both ends of the pocket piece for seam allowances. So you will have 3 and 1/4 inches on the two ends, and all the pins in between will be every 3 inches. If it isn't exact, don't worry about it. It will still work and still fit cars- even if one pocket is a little too small or too big.


4. Once you have that all pinned, you are ready to sew the pocket on. This is important: When sewing the pockets, make sure to over stitch onto the backing piece, and to double stitch. So stitch the lines, making sure to back stitch on both ends, and then go back over and stitch the lines again. This reinforces the pockets since little cars and hands will be going in and out of the pockets often...☻


Put your pocket piece aside. Pick up your road piece.


NEXT- Attach ribbon closure.


The ribbon attaches right where the lines in the road are at. So fold your ribbon in 1/2 and sew it and back stitch it right on the edge of the road so that it is even with the yellow road lines.


NOW we are going to attach our road to our pocket piece.
With right sides together, sew the long side of the pocket piece to the long edge of the road piece.


You are almost finished!


Now let's attach the backing:


1. Placing right sides together, place the large car piece (18 1/2 inches by 12) on top of the pocket and road piece you just sewed. Pin all edges together. Sew 1/4 inch all the way around, leaving 3-4 inches open along the long edge of the road side. Make sure to catch all layers, but make sure you don't catch the end of the ribbon in your seams. Make sure you catch the end of the ribbon you already sewed on inside of your seam.


Trim your seams. Turn right side out. Press. Now you are ready to top stitch. When top stitching, sew opening closed. Top stitch all the way around the edge of the road, close to the edge, and outside edge of the pocket. I top stitched along the top edge of the pocket backing too, so that on the backing, there are two lines down the center, and stitching all the way around the edge.


AND now you are done!


Please let me know if this makes sense or if you have any questions. I had my husband help me with this, and he really wanted me to be specific, so I hope I was. ☻


Fill it up with cars, and enjoy your new toy!!


If you make one of these, will you please leave me a comment and link it to this post? thanks! I would love to see yours!


Leave a comment if you have any questions and I'll comment back to you with the answer.


AND NOW FOR A LITTLE GIVE-A -WAY!!


In my etsy shop, I am selling already made ones, and kits. With this post, I am giving away a kit that includes all the pieces you need to make your own. I am also giving one away made.


♥ ☻♥ ☻ ♥ ☻ ♥


Leave me a comment if you want to enter! And we'll have the give-a-way end Thursday of this week.
***THIS GIVE-A-WAY is now CLOSED***


Here is what you can do if you would like some EXTRA ENTRIES:


(make sure to tell me in your comment what you did for extra entries)


*Followers- 5 extra


*Add Little Gems Button to your blog-5 extra... on the left-I'm still working on the code but there is a button you can add for now (it may need some fixin' up --later ;))


*visit my etsy shop and add me to your favorites-5 extra


*Purchase from my etsy shop-10 extra- (more items coming to shop soon)