Showing posts with label dollar store crafts. Show all posts

Monday, July 1, 2013

DIY Patriotic Wreath {for about $5}

Happy Fourth of July this week! I wanted something new and fun for my front door. After searching pinterest, I was inspired by this wreath from Tidymom.

 
I did mine a little bit different. I used embroidery hoops from the thrift store- I usually find them for about 30 -90 cents, and I pick them up for projects. This is a lot more affordable than buying a wire wreath form from the craft store, but it does take a little more work. I also used plastic table cloths from the Dollar Store! I only spent $3 on these- and almost have enough to make another wreath.


DIY Patriotic Wreath for about $5:
3 hoops- I used rings from embroidery hoops. It is best to use the inside part, but you can use the outside, just remove the screw, and extra wood piece and tape it together. Don't worry about if they are not the same size- after you tie on the pieces of plastic, you won't even be able to tell!
3-4 plastic tablecloths from the Dollar store- you need the most of red- so you may need two of these. Open the table cloths and keep them folded. I folded them one more time, so I had a long piece about six inches wide. I took my scissors and cut 1 1/2 to 2 inch strips, and then cut the ends apart. It was quick and easy to cut the tablecloths while they were folded up. Simply tie a knot for each piece, and push them close together. I'll be honest, this took me HOURS! It looks so easy and it is, but I think I may have spent up to 10 hours tying knots- which is why I'm only getting around to posting this now....and not sooner.

 Wooden Stars- I had some on hand-but you can pick up a small package of stars from a craft store (Hobby Lobby, Michaels) for a few dollars- or less with a coupon! I painted some and covered some in washi tape- I also had on hand. I attached them to some twine and tied the twine on either end of the wreath.

Wire- I had some wire, and carefully wired the hoops together in four spots around the wreath. This is a very lightweight wreath- so you really could just twist some wire, or twine, at the top and bottom so that all three hoops stay together.
 Hang it up and admire all those stinkin' knots you tied!! Because it does look kind of fancy...and no one will know you only spent $5 on the entire thing! Plus- since it is mostly plastic- it is water proof! We'll see how "heat proof" it is here- in the 100 plus degree desert!

Happy Fourth of July!!


post signature

Sunday, December 2, 2012

Ric-Rac Burlap Christmas Trees

 
Is it Christmas Time already?? I am so not ready for the madness. This year I really want to sit back and watch lots of Hallmark and ABC Family  Christmas shows...and sip some cocoa with my kids. But I do have a few projects I want to finish this year....first up my little colorful centerpiece....
 I have seen lots of super cute Styrofoam cones turned into adorable trees. Here is my super easy and quick- not at all perfect trees.

Here is what I did:
Ric-Rac Burlap Trees
You need:
burlap scraps
Styrofoam cones  Tip: get the Styrofoam cones- not the green ones used for floral arrangements.
ric-rac and ball fringe scraps {I tried to find more ball fringe...but I have to drive 40 miles to get some...so what I had on hand had to do}
hot glue
straight pins
 I just hot glued some burlap scraps to the cones. I knew I was covering it up with ric-rac and some scrap ball fringe, so it did not need to be perfect. I'm sure there was a better way to glue on the burlap, but I did not care as long as it was on there. :)
Next, I hot glued some ric-rac. One some I cut it in pieces, and on others, I actually just pinned it on using straight pins. I tried to match the color of the head of the pin to the ric-rac so you can't see it as much. That was it!

I found some small ornament balls at Target, in the dollar section, and threw those on the tray along with some other beads I had. I know the colors are all over the place- no color scheme here- but it is pretty and bright and makes me happy. See the old table runner- I am finally making the throw quilt from the same fabric line- that I started like...4 years ago. I think it may be time to go on a fabric buying fast. I love this fabric line.. {Merry & Bright by Moda Fabrics}....which is discontinued of course.

I hope you are enjoying the holiday season and having fun making or doing something enjoyable!

post signature

Monday, October 1, 2012

DIY Halloween Wreath & a fun photo

Finally I finished this little wreath. Last year I had all the supplies to make this and just never got around to making it. Yep, that is how it is sometimes.

 Here is what I did:

Foam Wreath (4.50 at Walmart)
Socks from Dollar Store
Old Wood/vinyl sign
Small broom from Target 2.50
Cardboard
Fabric Scraps
Baker's Twine
black yarn
black pipecleaner
googley eyes
First, I cut off the feet of the socks and thread the foam wreath through them. I cut an opening in the wreath so I could do this. I hot glued the ends in place. Next, I drew a shoe pattern on some cardboard and cut it out. I covered it with some black scrap fabric, and cut gold buckles from felt.
The wooden sign would not really stay attached to the broom and the wreath- since it was kind of heavy. So here comes the Baker's Twine. Let's pretend it is a cobweb....so it can hold everything in place better! Since it is a cobweb, I made a small spider using the same twine and some black yarn, added pipecleaner legs, and googley eyes. (Or maybe my 5 year old made the spider....since it kind of looks that way.:))  With the fabric scraps I made a tassle, and added a big fat fabric scrap to hang it up on .
 It's fun, it is different, and it was pretty easy. I'm not a big wreath making girl, so I was happy with it.
And I'll probably keep it inside for now....
 
 And just because you were nice enough to check in and read this post, I'll share my sweet little guy's current hair- do with you. It is really long, and rather mullet like- but I shall not cut it just yet. Cutting my baby's hair has always been a sign that my baby is growing up way too fast...so I put it off as long as possible.  It hangs in his face- and I have already cut the front just so he could see, but it is still very very long. He is oh so darling, and quite the little dude. I just love this little guy.

Thanks for reading! And Happy October!
post signature

Monday, May 7, 2012

DIY Crayon Monogram for Teacher Gift

This is another project I made LAST fall.... But since it is Teacher Appreciation Week- I thought I would share. I'm sure you have seen these crayon monograms around. The idea came from FAMILY FUN MAGAZINE.

There are different versions of this. We took the papers off of the crayons (soak the crayons in water and they come right off) and then Gorilla-Glued them to burlap. NOTE- don't use Gorilla Glue- it left a mess to clean up- since it expands when drying. Hot glue or super glue would probably be a better choice.
See what you learn when you make stuff? ha ha.
Anyway, the teacher loved it. It is really cute with the crayon papers left on. Check out pinterest- you'll see it a bunch.

Happy Teacher Appreciation! Is Mother's Day really Sunday?
I can't keep up with all these holiday events! 
When is summer? Wait. That is birthday crazy time at our house.
I need a vacation for all this celebration. :)
post signature

Wednesday, May 2, 2012

Make Play Swords from Water Noodles


We made these LAST fall. Yes, it has taken me that long to post some things...and there are more coming. Don't worry, I'll save the Halloween stuff for Halloween this year. This is a fun thing to do with a water noodle, and since -it is the season for water noodles, I thought I'd finally post it. I'm sure I saw this idea out there somewhere-pinterest perhaps?

 I used duct tape from the dollar store. They had a shiny silver tape- for a dollar, and all these fun colors. So the cost was very little. I cut the water noodles with a kitchen knife, to the desired length.
I covered the end with duct tape (actually just colored tape) in any design, and that was it. The best part is, they are still playing with them 6 months later...and no one is getting hurt by them-since they are foam- which is a good thing for my boys.

May the Force Be With You!

Thanks for reading!


post signature

Monday, April 2, 2012

DIY Sponge Stamps for Kids

 I bought these transportation sponges quite a while ago. I wanted to use them for preschool, but I did not want the kids to get their hands all dirty when they dipped them in paint. Enter the laundry detergent cap. I had been saving these- because somewhere I had seen them re- purposed into something- I don't recall what or when. BUT they made great handles for these sponges.

Here is the trick: Gorilla Glue. It works really well, as we only had one come apart, while washing them out. You need to let the Gorilla Glue dry for a while, and follow the instructions on the bottle when using! You also need to apply pressure to the things being glued together.


After carefully rinsing out the paint, I still have 9 of the 10 of these that I made. Pretty good. So they are ready to go for the next time we use them. Start saving those laundry detergent caps and lids- you just never know when you might need one!

Thanks for reading!
post signature

Saturday, March 31, 2012

Zoo Craft for Kids {preschool fun}


Way back in January, we made this cute craft in preschool. After looking for a new "zoo animal" idea, I saw a few similar ideas, and came up with this. It was a hit. The kids loved it.
ZOO CRAFT
Here is what you need:
regular size construction paper (1 per child)
standard sized zip-lock bag (1 per child)
animal crackers (5-10 per child)
pipe cleaners or chenille stems (6 per child)
crayons, stapler, single hole punch
Prepare beforehand:
Fold the paper in 1/2. Cut out a large rectangle in the middle of one side.
Punch 6 holes along both long sides of the rectangle. Write "zoo" on the top of  one side of the rectangle. Also, place the animal crackers in baggies.

 Let the children color their zoo. Then give them 6 pipe cleaners, and show them how to thread them through the holes, and bend the ends so that they create bars for the zoo animals. (You might have to help a few with the folding of the pipe cleaner ends.) Kids loved this part! For some reason, children this age really love pipe cleaners.

Next, place the baggie of animal crackers inside the folded paper and staple the edges. Now the animals will be safe in the zoo with no way to escape...- warn them to watch out for cracker-crazed preschoolers. Just sayin.

Have Fun and thanks for reading!
post signature

Thursday, October 20, 2011

Square Pumpkins {Halloween Crafting}

To see if you won the current give-a-way- scroll down to the next post!
Seems like there are 1000 different ways you can make some kind of pumpkin craft to display these days.
I ditched these pumpkins, I made a few years ago, and replaced them with these.
We have a lot of scrap wood in our garage- mostly from projects or pieces found in dumpsters. Yes, that is right. We found lots of wood in dumpsters from new construction. My husband cut me some wood blocks. I had a few wood spools (you can buy at craft stores) and a big plastic one that no longer held thread.

 After painting these guys with some craft paint, I added some designs...and then was not so sure I was loving it... so bring on the sand paper! I left the back sides of these bad boys plain orange- so if the designs start to bug me, I can just flip them over.
 I thought they needed a little something- so I made little tassels out of the fabric scraps.
 Ta-Da! All done. Super easy and I'm sort of liking the end result. BEST PART: cost was ZERO. Yes, completely free project- using only stuff I already had on hand.
Happy Halloween!! I love Halloween!

post signature

Wednesday, October 12, 2011

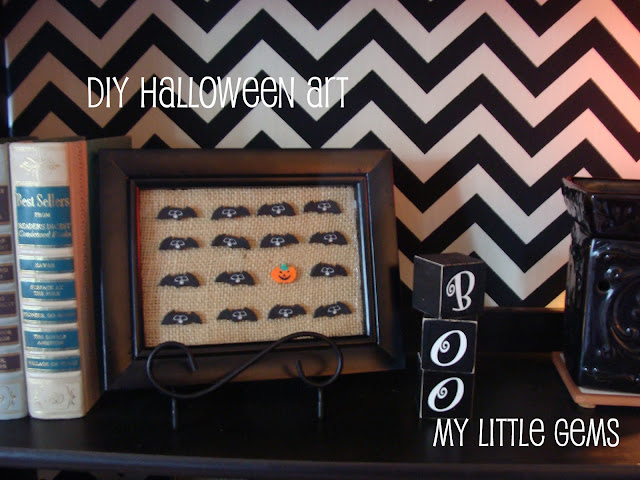
DIY Dollar Store Halloween Art {using mini erasers}

 I've decided that you can pretty much make holiday art out of anything from the dollar store. It is almost dangerous; because there is so much that comes to my mind while I am in that dang store...

I love these mini erasers. I find them in the dollar section at Target. Mostly I use them for preschool activities (the kids have no idea that they are actual erasers- they are just facinated by the cute little shapes).
So why not make some "art" out of them using a little hot glue, a dollar store frame and some burlap.
 I had to make three... because I thought they would look cute displayed together in a group of three. I just don't have a space to hang them up together, so I have them on my shelves in the great room.
Total cost for this project: less than $2 each- and that is because I bought dollar store frames. So who says you can't make art out of anything? And who says you have to spend a lot of money on Halloween decor? Nope. Not doing that this year.
 Hope I have time to finish my next idea... if it gets done I'll show you soon...- you can display this one in your yard if you want...

Happy Halloween!
post signature

Saturday, August 20, 2011

Lego Birthday Party Ideas

Hello! I did not mean to take such a long blog break- but a new baby will do that to you. However, he is doing much better- thank you for your sweet comments!

 I have a great Deseret Book CD give-a-way- this week- so make sure to check that out later.

In the meantime, since I threw a little Toy Story B'day Party today, I thought I'd better share the Lego Party from like...2 months ago! Keep in mind that I have seen your amazing parties- with a ton of cute printables, amazing cakes, unbelievable decorations, etc. I just sit back and admire them. I have 4 boys- and when I threw this one- I was 9 months preggers- so my motto is "sweet and simple". You can check out past boy parties we have done here. (You can also look under Creative Play and Preschool Ideas for other party ideas.)  As always- super simple and fun...(these are not magazine cover kid parties people.)

Here are some of the things we did for our Lego Party - credits and links I used to come up with this some of this, will be linked at the bottom of the photo they are found in.


 We found lots of great decorating ideas online. I sewed up some streamers- as seen here, bought a diposable tablecloth at the dollar store, and blew up some matchy balloons. I also cut out construction paper Lego pieces - using the printable found here. Instead of making huge birthday banners, I have decided to make a b'day poster- printing it up at Costco- and making it small enough to fit in a scrapbook album- so we can save them from year to year. I used a cute printable made by Delia Creates-which I also used to make party invites.
 Zakka Life provided this free Lego guy- which we used to let each child design their own Lego guy. This is what I had them do when they arrived. To keep it simple, we just used crayons, and the face was already drawn on the Lego guy cut outs. The kids were so creative with this, and really loved it!

 Here are some of the finished Lego guys. They wrote their name on them, and then as they got prizes, or other things to take home, they placed it on top of their Lego guy.
Guessing or Estimating how many Legos were in the jar was a fun one- but with 6 year olds, you have to give them a range of numbers to choose from. I told them there was more than 50 and less than 150 - to help them with the guessing. There was a small prize for the person who guessed the closest. We used these Legos later for another game.

 This was one of my favorite things to do- build a car- idea found here. To do this, I had to purchase a large quanitity of wheels, etc. and sort them all beforehand. We gave each child the same number of pieces and let them build a car. Next, we raced the cars-using the table as seen below.
It was fun to watch them race their cars- some just fell over because they had so many Legos on them- and some actually went very fast! So this was also  learning activity for all of the kids.

What child doesn't love I SPY games? We hid several Lego guys around the house- in plain sight- and had them look around to find them-"I SPY a LEGO Guy". We play this with every b'day party- whatever the theme is- we will play "I SPY" with it!

This is a game you could play several ways. We used a big flat Lego piece and passed it around the table. I had a brown bag, and the kids drew Legos out of the bag and added it to the Lego sculpture. I told them a number to draw each time. I was going to wrap up all the Legos and have them unwrap them, but I ran out of time for that. You could also use a dice, and have them roll a number and draw that number of Legos to add to the sculpture. We called it "Lego Collaboration". There was no winner- it was just fun to see what they could build with the Legos when working together. If the kids were older, you could have two groups and have them race.

Table: streamers, bubble wrap- I did not paint it- I just put the clear stuff on as a runner, streamers I sewed together, balloons, Lego pieces and Lego guys from construction paper...
The Cake- I am not cake decorator! I found this cake idea from Betty Crocker.- She never lets me down! I love the Betty Crocker website! The cake used marshmellows cut in 1/2 and a sheet cake to make the cake look like Lego pieces. The frosting was just regular frosting-not the prettiest-but- there is no fancy fondant in this house....

I purchased a box of Lego guys, and some Lego candy online. I put them in little baggies with some other little candies. The Lego candy is not that great tasting- but the kids absolutely loved it!  You can build with it too.


Our big present was the Lego Table we made from a Coffee/End Table. The kids that were waiting for their rides, played with this while waiting.
Overall it was a fun successful party. I am sure there will be another Lego party in this house someday....with four boys around~!

Great Lego Party Links:
And check out Pinterest!
If you still need an invite to Pinterest, send me an email. (see contact tab at top( 

Thanks for reading!
oxoxo

post signature

Saturday, July 2, 2011

Happy Fourth of July Weekend!

 Happy 4th of July Weekend! I didn't entirely forget about the 4th- even if my husband only gets today off and has to work the entire weekend. :( I did whip of a festive wreath- with fabric scraps, hot glue, and Scrabble tiles. I picked up the felted stars at JoAnn's (6 for $1).
{Blogger was giving me a problem this week- so I lost some of the things I planned to post and have to start over...sorry. darn blogger.}

Most of today will be spent doing this:
I have a really incredible husband! We are painting today....and having a family BBQ!
Hope you all have a great 4th of July Celebration!
I'll be back next week with lots of fun stuff....just in time for baby to arrive!
Thanks for reading! oxoxo
post signature