Showing posts with label organizing and decluttering. my life organized (MLO). Show all posts

Tuesday, August 14, 2012

My Great Big Magnetic Job Chart {using an oil pan}

 Have I ever mentioned that blogging is work? Well it takes time...and I have been spending my time in other ways. sorry readers.I have a lot of things I would love to post...but I am busy living my life...and that takes a lot of time.  ANYHOO I'm getting around to one of those posts....

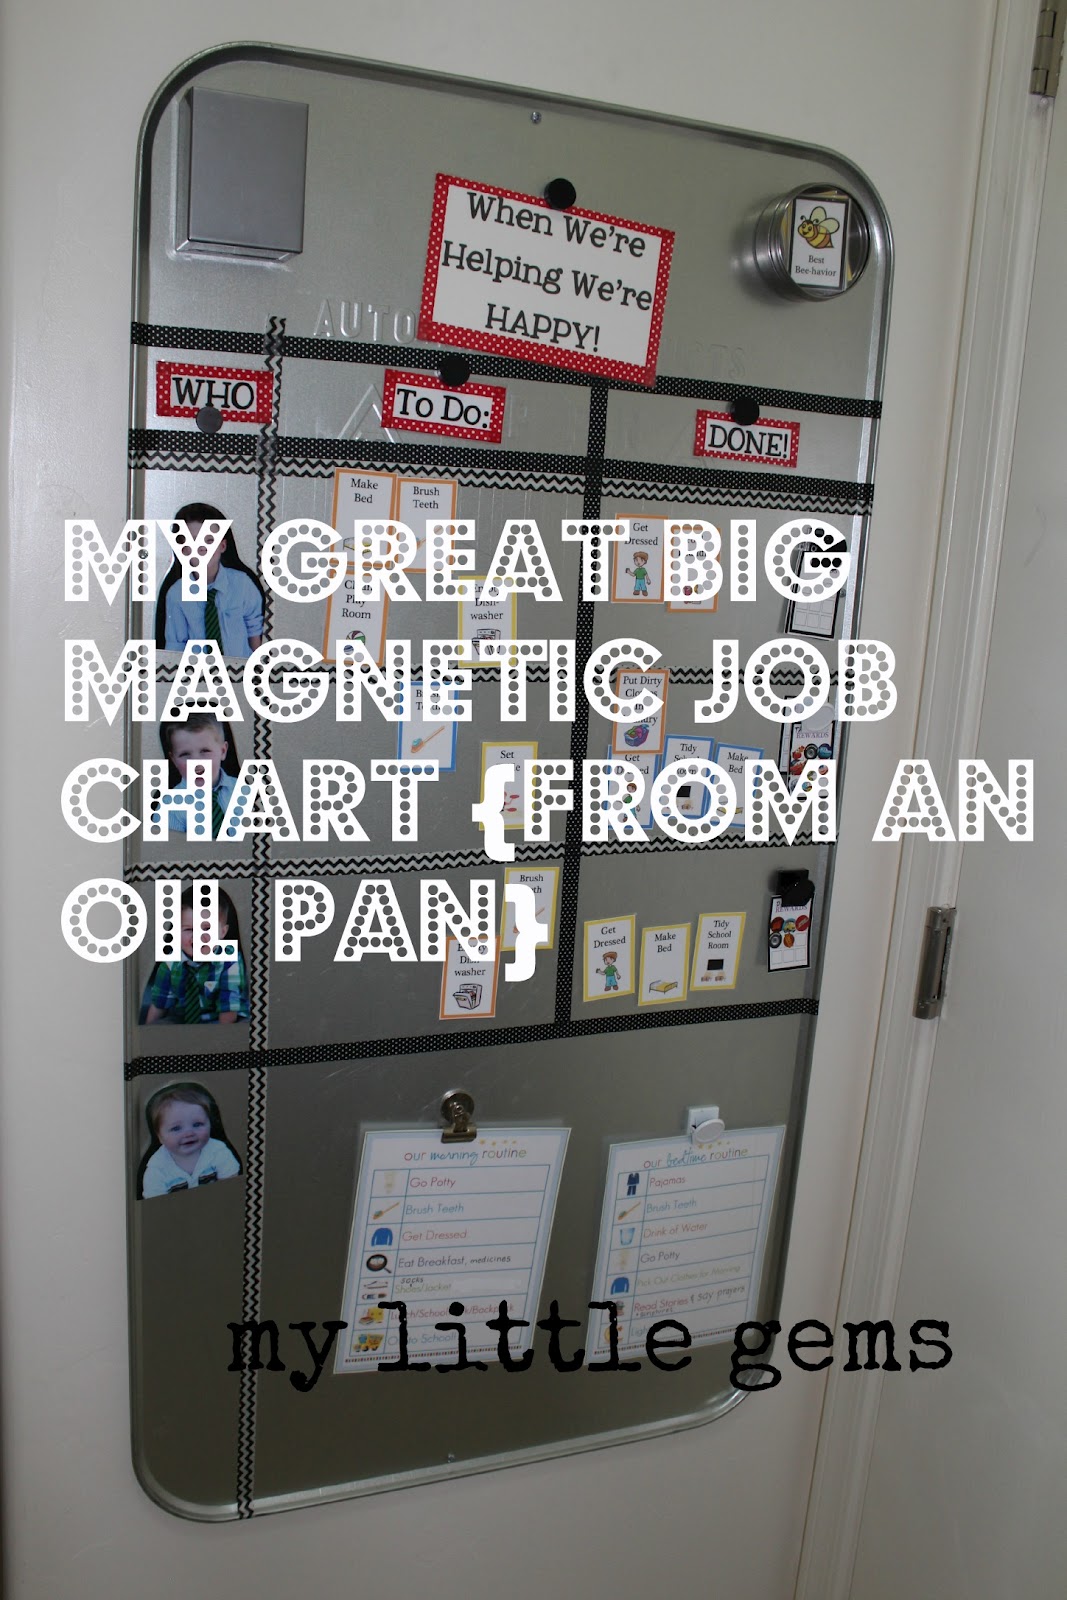
... A few months ago I made this huge job chart for my kids. And ta-dah- it has actually been working! We hung an oil pan (make sure it is magnetic) from Walmart ($12) up in the laundry room. There are still a few little things I have to do -like glue magnets to some of my signs. I found jobs that fit our family online- I think I went to I heart organizing for most of them. It was so long ago- I can't remember. But thank you to all you wonderful people who make cute free printables for me to use in my home. I heart you. I made a few of my own signs, and magnets using the kids photos. The charts on the bottom are from I heart organizing- morning and evening routines. I just hand wrote the changes our family has- right on the chart. When school starts, I am going to use the bottom part for some kind of school work/homework area.
I added washi tape to make sections for jobs to do and jobs done. I have little reward cards that they get stickers for- usually for doing their jobs, and if they do something super nice I give them an extra sticker. The sticker cards turn into "prizes" or extra fun things- like getting a pizza for dinner one night, or a movie, or game night,etc. It has worked really well with my kids- something about great big charts that makes them want to do things and be happy about doing it...... I like charts too. They make me happy.

Thanks for reading!
I have seen tons of cool chore ideas on pinterest...follow me there.
 
{I shared this idea here- cause they asked me too- and they are super nice!}
 
 
post signature

Monday, July 30, 2012

Scrabble Tile Wipe-Off Menu Board

 In case anyone is still reading this blog...I thought I'd finally share something with you I made a while ago...a {caute} menu board. I actually made this wipe-off board years ago using an old picture frame- that I spray painted and added fabric behind the glass. I wasn't really using it though and wanted a menu board in my kitchen- - that would perhaps- urge me to plan better meals for my family. I had a paper calendar I was using- but sometimes I'd plan and sometimes I'd just pull something out of the pantry. Anyone know what that is like?

So here is how I did it: I used this picture frame-and added some fabric and ric-rac behind the glass. Then I used Gorilla Glue to glue on the scrabble tile pieces. To weigh it down-which you have to do with Gorilla Glue- I just put lots of books on it. It worked but moved the tiles a little- so they weren't as straight as I would have liked. Oh well.
 The little letter holder from the Scrabble game, works for a pen holder, but you could also spell out today's meal on that- like use the letters and put up "PIZZA" or whatever you are eating.

Another thing I have been doing to simplify meal planning, is planning from certain categories on specific nights- you can see that on the right of the board- I change it every once in a while- so I did not want to put it on there permanently. I attached the menu board to the side of the fridge using Command Velcro Strips. I love those things, but can they please make them less expensive?
That is it. It is fun- my kids love looking up to see what we are eating. The bright colors and fun look makes meal planning a little more exciting for me- so it is a win-win.
Thanks for reading!

post signature

Thursday, March 22, 2012

A Few Favorite Cleaning Products

It is Spring Cleaning Season! I recently had a birthday, and my wonderful husband got me a housecleaning service for 3 hours! I think I'm gonna save that for when the house is super duper messy. In the meantime.... I have been doing a little cleaning...even though with 4 boys it might not look like it....but anyway- I thought I'd share a few favorite products with you.

Mrs. Meyer's All Purpose Cleaner
My friend recently introduced me to this. This is like aromatherapy and cleaning all in one. It smells so good, and has a lot less chemicals in it than some other cleaners. I really like this stuff. It is a little more expensive than most cleaners, but it sure makes cleaning a much more pleasant experience.


Clorox Pen
I used this to clean the grout recently. And it works pretty good. I only did it on a few places in the kitchen and the powder room/bathroom. But there was a definite difference! I do keep this on hand for hard to get out spots when doing laundry. I will be using this again. Thank you pinterest, for reminding me about this little wonder.


Lemi Shine (for the dishwasher)
We started using this product about a year ago when we noticed the hard water was leaving lots of spots on our dishes. Getting a water softener is not an option, so we use Lemi Shine. We love it. You only need a tiny bit, and you add it to your detergent. The dishes come out so much cleaner, and spot free!


Vinegar
My favorite all purpose cleaner! I add this to the prewash for every load in the laundry. It helps the detergent work better by breaking down some of the soap that would usually build up on your clothes. It also helps get out stains and mold or mildew. I notice my whites are whiter and my brights are brighter! And vinegar is very inexpensive- bonus!
Another thing it works well on is stainless steel appliances. Put some in a squirt bottle w/ water, and you have a great cleaner for wiping away finger prints on the fridge.

OxiClean This is another great cleaner for grout and laundry and everything else. I really like the spray for stains. I spray it on everything and get just about everything out!


I found tons of great cleaning tips while browsing pinterest....thank you pinners!

What are some of your favorite cleaning products? I would love to know!

Happy Spring Cleaning!


post signature

Tuesday, July 5, 2011

DIY Lego Table {from an old Coffee or End Table}

For my son's birthday, I decided he needed a Lego table. I was pretty sick of stepping on those dang Legos. After doing a little research, it turned out that most Lego tables, were around $100. No thanks. So we made one instead for about 1/2 of that.
Here is what we did:
DIY LEGO TABLE:
We found the perfect table for $20 at our local thrift store. While this was more than I wanted to pay- I only wanted to pay like $5- this was the perfect table, that hardly needed any work. It had a set in glass top, and an edge around the top; it had solid wood legs- just what we wanted to add wheels to the bottom. It was also solid wood, not like the cheap-o Lego tables you buy- this was much sturdier.
SAND, PRIME, PAINT-we sanded it down and removed the criss-cross stuff and glass from the top.
We primed it wish spray primer- Krylon brand. Next we spray-painted it also with Krylon paint. We used 2 cans primer and 2 cans paint- total $12.
ADD LEGO PLATE TOP- I purchased 4 Lego plates- that were 10 by 10 inches each. These were about $5 each. ($20 total). My husband used Gorilla Glue to attach them- lining up the little Lego dots- which is very important- so your child can attach their Legos anywhere on the the table top. It is also important to use something heavy- and apply even pressure to the top while the glue is drying.
ADD WHEELS-My husband wanted it to have wheels so it could easily be moved around. The 4 wheels were a total of $6. He also purchased a few screws to attach them.


That is it! It was really rather easy, and quick! It cost us $58. I'm sure you could find a cheaper coffee table- or use one you already have and save more money.  Since we have almost 4 boys, I'm sure we'll be using this for years to come- as long as they can share! {We don't have room for 4 separate Lego tables- ha ha.}
And although there are LESS Legos on the floor, for some reason- some still end up on the floor.... now to get the right containers to store the things in..... right now we are using plastic bins w/ lids- that never get put on...
thanks for reading! oxoxo
post signature

Monday, April 11, 2011

Another Room Make-over: Craft Room/Multi-Purpose Room {part 3}

 I finished up this room. yay! The craft room/office/multipurpose room!
Well it is not completely finished, it still needs some paint on the walls, etc. BUT it is a lot closer!

Here are some of the many BEFORE looks:
{This one is the most recent}
And before this mess, was this:

This was a lot better than what you will see next, but there just wasn't enough storage for all the crap/craft stuff.

I was using this yellow dresser {which I love} and it just wasn't making the cut. The dresser is now my new changing table and  it is working really well. I actually sold the other changing table-which was your standard changer, with drawers and shelves. This one is cuter. :)
And because the yellow dresser wasn't making the cut... I was dealing with this- which made it hard to do anything:

So obviously, I needed some order and organization if I was going to ever sew anything again!
And would you believe I have at least a bin of fabric and a bin of paper crafting/scrapbook stuff....for a yard sale we are planning soon. Can we say -  too much craft crap  stuff! Seriously...too much!

As part of revamping this room into something usable, here are a few little things:
IKEA cork boards covered in fabric:
                                                  My first attempt at recovering a lamp shade:
The wall you see when you enter- fabric covered canvas squares, Target dollar section bins to hold some junk, and other stuff I can't part with yet...

And finally the big AFTER:

Of course, it will look a lot better, with some paint on the walls. I'm sure it will never be done, as I can think of a ton of things I would do to improve the space, but it is so much better! Let's hope we can keep it semi-clean....

Thanks for reading! oxoxo

post signature


Monday, March 14, 2011

Organizing my Craft/Mulit-Purpose Room

Have you entered the Shabby Apple Dress Give-a-Way yet? Go HERE to enter!


Several weeks ago, I started reorganizing this craft space.
This room houses my preschool stuff, computer, sewing, crafting, and  even use it  for guests.
It is FAR from finished. It is one of those spaces. In fact, since taking these photos, it has already been changed. I still need IKEA. {sigh} Which is just over 100 miles away... Now we are thinking of buying another shelf like this and doing a whole wall of shelving....
And I need some paint on these walls.


At least I cleaned up my sewing space. Except...you should see the pile of half- finished projects.....

Better get sewing....
Happy Monday!


post signature

Tuesday, March 1, 2011

A Place for Everything: My Craft Cupboard

I'm in major "nesting" mode. I am cleaning and organizing everything. I have also been watching this show.
I love Peter Walsh. I watched him years ago on Clean Sweep, so I was happy to see him have a new show on OWN.

This is my craft cupboard. I have had this little cupboard since I was 7 years old. My dad built it for me for Christmas one year, and it has followed me around since I left my parents home. I love it.  (Although I really want to paint it...any ideas on a "caute" color?)

Over the years my little cupboard has had a lot of uses, but this one is here to stay. With the help of that darn Target {seriously they should pay me}, I found all these cute little bins in the dollar area.
And they fit in the cupboard perfectly! The top shelf is old plastic salsa or condiment containers from Costco. It is a pain to get the smell out, and the sticker label off the jar, but- it was free so I was all for doing the work so I could reuse the container.
I went through drawers of junk, and plastic bins of paper crafting stuff, and organized every last little brad, nail, clip, button, ribbon, piece of chipboard, and tac.

The small drawers hold adhesive and ink pads. The cupboard holds 8 by 8 paper, and empty albums.
The other things, like pens, markers, and scissors, have to go up really high- so my kids don't have an art party! I'm sure I could add some cute labels to the little buckets- but you know, I have boys- and they will just come and pull them off! Plus, I can see what is inside of them, so it works for me.
Enough Already has really taught me that you have to set limits for your stuff- as you organize and that is exactly what I have been doing - through every area in my house. Let me just say- I have a bin of scrapbook stuff, and a bin of sewing stuff,vinyl letters & signs, home decor, and more- for a yard sale and  for donating....along with 1/2 a garage full of other stuff! It feels so good! I have more to show you....hope you love organizing as much as I do! :)
Is anyone else doing some decluttering/spring cleaning? I'd love to hear what you plan to keep and toss!
Happy Decluttering!
post signature

Tuesday, February 15, 2011

1/2 Bath Powder Room Make-over

We finally got around to finishing {almost} our 1/2 bath/powder room.  This was the standard builder's bathroom- nothing fancy, white walls. Basically functional, but very boring.
We bought the paint over 6 months ago and finally got it up on the walls in January.  The paint color is called Ocean Breeze from Sherwin Williams. (I'll have to find the paint can and double check but I think that was the name of it.)
Using things I already had, I did a little "beach" themed decorating. Since it is a really small bathroom, I'll show you wall by wall what I added. 

Wall 1: This is my favorite. I put photos on canvas from our recent a (and first) trip to the beach this past fall. I made these 11 by 14. I have ordered photos on canvas from about 4 different companies. So far, I am the most pleased with Costco. The wrap the photos using thick edges- probably 1 1/2 to 2 inches, and do not charge extra for it. You can also add effects to your photo at no extra cost. Right now they have a coupon for $10 off each canvas (limit 2) that you order. You can do the entire thing online, and pick it up at the store- so no shipping charges. They have pretty good prices too.

 Wall 2: This is one of those things I already had. I just changed the photos to my favorite family beach photos. I used scrapbook paper for the other frames.  This wall could probably use something else, but it is behind the door, so you don't see it much. I do plan to add a small hand towel rack to the wall by the counter.

 Wall 3: The curtain was made from fabric in my stash.  The little thing below the window is old- from forever ago Target find- it was black and we spray painted it white.

And the last wall...White Ruffle Towels are from Target- on clearance. My husband hates them. He thinks they are too "girly". So I told him, I'm adding ruffles to every towel in our house. ha ha ha....hey- I am the only female in this house. :)
The frame above- had forever- just added a coat of white spray paint to make it look fresher. The BEACH sign is from forever ago too- a Home Goods find.
STILL TO DO: Frame the mirror, and add hardware to the cabinets, new light fixture, and crown molding. I don't think I'll be doing any of that fancy ceiling stenciling you are seeing everywhere. Love it, but can't do a stencil...reminds me of when I stenciled my room in 9th grade. :)
So now, I have a little reminder of the beach in my house. :) OK so it is a beach bathroom. I still can't feel that ocean breeze, and sometimes it stinks and is covered in sticky kid fingerprints.
 At least, it is a more pleasant experience to clean this bathroom. :)

Hope you had a fun Valentine's Day! Thanks for reading! oxoxoxo
post signature

Thursday, August 26, 2010

Fabric Book Pocket/Sling {Fabric Book Holder} Tutorial

I needed a solution to the never-ending pile of books on the top bunk bed. Let's face it, I am not climbing up there everyday, and therefore, books were piling up- up there.
Here is my solution- a fabric book sling pocket thing!
I saw a similar idea in Family Fun magazine. And if you don't subscribe to Family Fun, you really really should! (I mention it so much on here, they should pay me! ha ha ha)

I made my pocket kind of deep so the books don't show unless they are really big books. You can make yours as deep as you wish. We used 2 U-shaped curtain rods-because these are very inexpensive. You can see here- how it looks with the rods and with things in it.
If you use these rods please note: I used 2 sets- a part from the set from Target and a part from the set from Walmart- both will run you about $3-4 dollars. The reason I did this is because one set  from one particular store did not have enough space in between the two rods. You have to make sure your rods have enough space between them for putting books in and out of this opening. This is the reason I used a set of rods from Walmart, and a set from Target- to get two different sized rods with enough space between them for books.

HOW TO MAKE A FABRIC BOOK POCKET/SLING:
you will need:
2 pieces of fabric 45 inches wide, and 30 inches long- if you want your books to show make it about 25 inches long instead.
2 long strips of heavy interfacing
thread/sewing machine
an iron
2- u-shaped curtain rods or 2 double curtain rods (or holders and dowels that fit)

1. On the shorter ends of one piece of fabric, iron on the interfacing across each end. This is where you will make a casing later.
2. NEXT with right sides together,  sew the two pieces of fabric together, leaving an opening to you can turn it right side out. It is a good idea to pin the fabrics together when you do this.
3. Turn the fabrics right side out and press.
4. On the shorter ends, fold the fabric over to make a casing. The size of your casing will depend on the rods you are using. I made my casing just over an inch wide, and my rods were about a 1/2 inch in width. Press this and then sew along the long edge only.
5. When your casing is finished, fold your fabric in half so that both casings are lined up. Press and iron well.
6. Now you are ready to hang up your book pocket with your curtain rods.
When your rod brackets are hung, thread the rods through the casing of your book pocket, and you are done! Hang it up and fill it with books!


I plan to make more of these, so I will try to get a better tute w/ photos. It was pretty easy, so hopefully the above instructions will help you out if want to make one. Let me know if you have any questions and happy sewing and happy reading!

post signature

Thursday, February 4, 2010

Make a Chore Chart from a Place mat

So if you read the post right below this one, you can probably guess that a "Chore Chart" is desperately needed in this house. {Although if you are a mom of young kids, you know that you do most of the "chores" anyway.}
Well no more in our house! {yes, insert laughter here}
My four-year-old son wanted a chore chart. {yes, we'll see how long that lasts...} And I wanted to make stuff out of dollar store place mats. So we both win. ☻
HOW TO MAKE A CHORE CHART FROM A PLACE MAT:
1. Using the backside of the place mat {all these crafts are the same type of place mat from the Dollar Tree}
I simply sewed some pockets. I used a pocket off of some old toddler jeans, and cut the others to match from fabric I had in my stash. Pockets make this chore chart very versatile. You can change and update the jobs/chores anytime.
2. I used my favorite "Wonder Under" to attach the numbers to the front of the pockets.
3. A cut up plastic tape measure makes the handle. I also sewed a strip of the tape measure along the bottom, sewing at every inch, so that it made little loops. This is where the "stars" go when all the chores are done.
4. This is light enough that it can be hung with some magnet clips on the refrigerator, or it can be hung up on the corner of a chair, a hook, anywhere you want to put it so that your child will see it.

5. The job charts are chipboard, with modge-podge paper on each side, and hot-glued to a Popsicle stick. When one job is complete, the card flips over to say "done!". I plan to replace these or update these, but we needed a job chart now- because mommy is tired of doing all the chores and...I have a very anxious 4-year-old who wants one.
6. The stars are for when all the jobs are complete for that day. I cut a star from felt and hot-glued it to a paperclip. The paper clips clip right onto the yellow tape measure loops at the bottom.
7. WOW- looks like someone did all their jobs! The little denim pocket (from an old pair of jeans) at the end of the tape measure is to store all the stars.  When he completes his little chores, I told him he can have a quarter. When he gets 4 quarters, we'll go to The Dollar Tree and buy more place mats. Just kidding. He can buy a dollar toy. Let's hope this works. He is excited to do chores, and now he has a super cute chore chart. Maybe he'll want to do chores all day! ha!
I'm thinking maybe I need to make another one for potty training my 2 year old....except I'm not ready to potty train him....yet. But He is totally ready.
There are some super cute chore charts on Tip Junkie. HERE is the link for more ideas for Chore Charts.
I have one more fun place mat craft coming up soon!

Saturday, July 25, 2009

You know you have a good husband when...

You know you have a good husband when he makes you strawberry frozen yogurt on his day off which tastes divine... and he does it just because you wanted it... (photo via simple recipes)
And you know you have a really good husband when he then he stops at Super Wally's on his way home from a 14 hour shift at work, to get a bunch of stuff you requested to support your crafting habit- (even though you already went over the monthly budget because you went to Target one too many times... o.k. you only went once but that was enough to do it...and even though you don't have time from crafting these days but you wanted that stuff in the house just in case... and because eventually he will have a day off and you will find a moment to make something-)


And you really have a great husband when he comes home to this mess, after HE cleaned it spotless the night before, he so doesn't even complain about it.... he cleans it up for you.....


AND you know you must have the most amazing husband in the world when he even tackles this mess and then holds the screaming baby while putting the other kids to bed and trying not to fall asleep in the process- just so you can take a long hot shower because all you did all day was feed kids and change diapers... Yes, you know you have a good husband- good is an understatement. I am very lucky. I think I'll go tell him that...☻☻☻