Showing posts with label food and kids. Show all posts

Sunday, December 8, 2013

Delicious Cinnamon Roll Breakfast Cake

Hello! I thought I'd take a second to share a family favorite recipe- great for the holidays. I actually started this post in the summer -- and then twins and life took over!

This is rich enough to be dessert, but we eat it for breakfast! It was a hit at our house and is one of our family favorites! I lowered the amount of butter a little from the original recipe, but it is still very rich, moist, and delicious! You can make substitutions-{flax seed for eggs, soy milk instead of dairy, etc.}  in this recipe and it still works and turns out great.


Delicious Cinnamon Roll Cake

3 cups flour
1/4 tsp. salt
1 cup sugar
4 tsp. baking powder
1 1/2 cups milk
2 eggs
2 tsp. vanilla
1/2 cup butter, melted
TOPPING:
3/4 cup softened butter (1 cube plus a half)
1 cup brown sugar
2 TBSP flour
1 TBSP cinnamon
GLAZE: 
2 cups powdered sugar
5 TBSP milk
1 tsp. vanilla

Preheat oven to 350. Prepare a 9 by 13 pan by spraying it with cooking spray. 
In your mixer, combine flour, salt, sugar, baking powder, milk, eggs, and vanilla. When that is combined, slowly add the melted butter. Pour into the prepared pan. 
Next, combine the topping ingredients 3/4 cup softened butter, 1 cup brown sugar, 2 TBSP flour, 
1 TSBP cinnamon, until creamy consistency. Drop evenly over the batter using a tablespoon. Swirl it into the cake using a knife. 
Bake at 350 for 35-40 minutes.
GLAZE: Combine glaze ingredients-powdered sugar with 5 TBSP milk and 1 tsp vanilla. Use a wire whisk to combine well. Drizzle all over the warm cake. This can be served while still warm or later...it is great either way. 
{recipe adapted from Chef In Training}
post signature

Sunday, September 1, 2013

White Chocolate Pudding and M&M No-Bake Cookies

Hello.... I know I have been MIA from this little blog. Too much going on around here- preparing for two new babies who will be here in just over a month! Since school has started, a month ago, it has been really busy running kids here and there, doctor appointments, doing preschool twice a week- just crazy busy. We wouldn't have it any other way, but it leaves less time for blogging and sharing what has been happening with you. ☺♥♥♥ So thanks for reading anyway!


Here is a delicious treat, so fun, quick, and easy,- and also a great one that your children can help you with!

White Chocolate Pudding and M&M No-Bake Cookies

2 1/4 cups sugar
2 TBSP butter
6 oz. evaporated milk
4 oz. white chocolate instant pudding mix (just the mix)
3 1/2-4 cups old fashioned oats
1 - 11/2 cups M&M's

Combine sugar, butter, milk, and pudding mix in a saucepan.  Bring to a boil. Remove from heat. Stir in oats. Remove from heat. Cool for at least 15-20 minutes. When cool, stir in M&M's. If you do this too soon, the M&M's will melt-so make sure the mixture is cool. Drop by spoonfuls onto a cookie sheet covered with parchment or wax  paper. Pop the pan in the fridge for quicker cooling, and so the M&M's don't melt. When cool, they are ready to eat!


post signature

Sunday, August 11, 2013

My Despicable Me Cake {it;s even lemon flavored}


We have seen a lot of fun movies this summer, and loved Despicable Me 2! With all the birthdays we had this summer, we just had to make a Minion Cake. I owe this inspiration to Pinterest- thank you you incredibly creative people with lots of time on your hands- you all had so many great ideas! Mine is a little different - because I only do super easy cakes. I will share the recipe with you later- because the cake is lemon flavored- and really good!


Minion Cake:
I made one rectangle cake and cut off the corners to round it  as shown. After frosting it as above, I used a Little Debbie's whoopee type pie with the top cut off for the eye, with a Hershey's kiss placed in it. The glasses are just gray frosting, and black licorice. The buttons on the overalls/pants are also Hershey's kisses. No fondant- I did find a great frosting recipe that spread really smooth that I used for the yellow.

Anyway, it was a fun and super easy cake!

Thanks for reading!

post signature

Sunday, July 28, 2013

Nutella Swirl Blondie Bars

I have a great recipe for you today- using one of our favorite things- Nutella!

These bar cookies are great, and very delicious and rich. These are also a fun twist on a traditional bar cookie, such as congo bars -a family favorite around here.


Nutella Swirl Blondie Bars

1 1/2 cups packed brown sugar
1 cup unsalted butter, cut into small pieces
2 large eggs plus one egg yolk
1 tsp. vanilla
2 1/4 cups flour
1/2 tsp. baking powder
1/4 tsp. salt
1 1/2 cups butterscotch chips
4 oz. cream cheese, softened at room temperature
3/4 cup Nutella

Preheat oven to 375. Grease a 9 by 13 pan. Line it with foil-letting it hang over the edges- (optional) and spray or grease the foil. (I just sprayed the pan, but I think the foil would have been better.) Combine the sugar and butter on the stove over medium heat. When butter has melted, remove from heat and let it cool slightly. Add the 2 eggs and vanilla.

  • In another bowl, combine the dry ingredients- flour, baking powder, and salt.  Gradually add this mixture to the other mixture. Mix until smooth. Add the butterscotch chips. Press evenly into prepared 9 by 13 inch pan.
  • With an electric mixer, beat the one egg yolk, cream cheese, and Nutella until smooth. Drop by spoonfuls onto the other mixture that is in the pan. Now using a small knife, swirl in the Nutella making a design or decorative pattern. Well just do the best you can and try not to scrap the bottom of the pan.
  • Bake for 25-30 minutes at 375 OR until a toothpick comes out pretty clean when inserted. Let cool, and chill in fridge for 1-2 hours. **I found I needed to cut them before chilling them or they were harder to cut. Serve them at room temperature. Great with a glass of milk! These are rich, and chewy and very yummy!

My kids LOVED these! They are really good. Like most bar cookies, I found it helpful to cut them while still warm. I also did not use the foil in the pan, but I think it would have been better to do so.
*recipe found in an old issue of ALL YOU magazine

thanks for reading! ENJOY!


post signature

Sunday, July 21, 2013

The Best Blueberry Muffins

We make these often on Sunday morning. They are really good. I have tried several blueberry muffin recipes and these are the best I have found. {I adapted this recipe from one in the Savoring the Seasons with Our Best Bites Cookbook.}

Best Blueberry Muffins
1 3/4 cup flour, plus 1 TBSP. flour
2 3/4 tsp. baking powder
3/4 tsp. salt
1/2 cup sugar, plus 1 TBSP. sugar
2 tsp. orange and lemon zest (can use one but better with both)
1 egg
1 container (5.3 oz) greek yogurt- any flavor but vanilla works well
1/3 cup plain applesauce
1 cup frozen blueberries (can use fresh)
Preheat oven to 400. Combine the 1 3/4 cups flour, backing powder, salt, and1/2 cup sugar with the zest of orange and lemon. **Tip- keep orange and lemon peels in the freezer in a baggie. Then you can take it out and use it as you need it.**
Make a well in the center of the mixture and add the wet ingredients-egg, yogurt, and applesauce. Mix all together. In a separate bowl, combine 1 tbsp. flour, and 1 tbsp. sugar, and toss with the cup of blueberries until well coated. Fold blueberries into the batter.
FOR STEUSSEL TOPPING:
Combine:
1/4 cup sugar
2 1/2 TBSP flour
1/2 tsp. cinnamon
Cut in(using a pastry cutter or small knives)
1 1/2 TBSP butter or margarine
Spoon batter into sprayed muffin tins, or ones lined with papers. Sprinkle the steussel topping on top of the muffins. You will probably have extra.  Bake at 400 for 18 minutes or until golden brown on top. Remove from pan and allow to cool- muffins will be hot- especially the blueberries.

These are great! Thanks for reading!

post signature

Wednesday, June 26, 2013

Easy Layered Ice Cream Cake

Here is a great summer dessert that takes no time to make, and tastes delicious. This couldn't be easier. It would make a great addition to a Fourth of July celebration.
Here is what you need:

Easy Layered Ice Cream Cake:
10-12 store bought ice cream bars
1 jar hot fudge
1 package Oreos (you won't use them all
1 container cool whip (8 oz-but it won't hurt to have more)

Here are the instructions in photos:
(When done freezer overnight covered with foil. You could freeze it for 4-6 hours, but you will need to freeze it before serving. Take it out a few minutes before serving and cut into squares.)


post signature

Sunday, June 2, 2013

Milky Way Cookies {Sweets on Sunday}

I'm  back with Sweets on Sunday!! {I might even have a whole week of posts for you....eeek!!}

I'm always looking for ways to make chocolate chip cookies even better! I didn't even have to go out and buy anything- since I had mini milky ways in the freezer. I may or may not have had a few for breakfast. I've posted the recipe with a few tips and tricks to make these turn out just right.


Milky Way Cookies
{recipes found via pinterest, on the picky palate}

2 sticks softened butter *take this out of the fridge before hand so that it is at room temperature
¾ Cup sugar
¾ Cup brown sugar
2 eggs *take these out of the fridge before hand also- so they are at room temperature
1 teaspoon vanilla
2 ¾ Cups flour
1 teaspoon baking soda
½ teaspoon salt
35 mini milky way *I used 29 cut up into small pieces, and about 1/2 cup of semi-sweet chocolate chips (you don't need the chocolate chips though)
*I also used a combination of dark chocolate and milk chocolate mini milky ways
 
Preheat oven to 350 degrees F. Cream together the butter and sugars. Beat in eggs and vanilla all combined. In a separate large bowl combine the flour, baking soda and salt. Slowly add to wet ingredients along with the chopped milky ways. *I put my cookie dough in the fridge for 1-2 hours before baking. This really helped give them a nice shape. When they came out of the oven, they looked puffy, but after cooling on the cookie sheet, they were perfect.
2. With a small ice cream scooper, scoop onto parchment lined baking sheet. Bake for 9-11 minutes, or until cooked to your preference. Let cool for 5 minutes on baking sheet then transfer to a cooling rack.*I found that mine needed to cook for 11 minutes. I live at a lower altitude. I let them cool on the cookie sheet and transferred them to a brown paper bag- ripped open flat on the counter. The cookies cooled to perfection!


post signature

Sunday, November 18, 2012

Pumpkin Pudding No Bake Cookies

You may remember when I shared the pudding no bake recipe.
Well have you seen the Pumpkin Spice Pudding mix?


I bought some last year...never used it, until today. Yep, sometimes things sit around here for a quite a while before they get used, or {gulp} put away, or cleaned.

Anyway, these cookies are so good! They have no eggs- so if your child has an egg allergy- I think you are good to go with these. As far as I know the pudding mix does not have eggs in it.
AND- bonus- they take like 10 minutes tops to make.

So here you go:

Pumpkin Pudding No Bake Cookies

2 1/4 cups sugar
2 TBSP butter
6 oz. evaporated milk
4 oz. pumpkin spice instant pudding mix
3 1/2-4 cups oats

Combine the sugar, butter, milk, and pudding mix in a saucepan. Bring to a boil.  Removed from heat and stir in the oats.  Cool for 15 minutes in the pan.  Drop by spoonfuls onto wax paper. Allow to sit for an hour, or put in the fridge.  Enjoy!


These would be great on Thanksgiving for the little ones who might not like pie, but still want dessert!
Happy Thanksgiving!

post signature

Sunday, November 11, 2012

Pumpkin Bundt Cake with Pumpkin Cream Cheese Frosting

Tonight I tried something new for me: Pumpkin Bundt Cake- to use up some cream cheese frosting- with a little hint of pumpkin in it- cause I am a sucker for anything flavored with pumpkin and cream cheese.  Here is what I did. I hope it works for you like it did for me, it was delicious! {Note: I sort of improvised with the frosting- see details below. I also added the spices with not exact measuring- as noted below. I don't think you can mess this one up though- if you are a pumpkin lover like me :) }


Pumpkin Pie Bundt Cake:
2 cups granulated sugar
1 cup butter, softened  OR I cup unsweetened applesauce- {I used this instead of the butter}
Mix together, and add the eggs one at a time.
4 large eggs
1 cup canned pumpkin {pure pumpkin, not the kind for pumpkin pie}
Mix in, and then add sour cream.
1 cup sour cream {I used a fat free kind}
2 teaspoons vanilla extract
3 cups all-purpose flour
Add the flour one cup at a time, and then add the ingredients below.
1 tablespoon ground cinnamon
  2 tsp. pumpkin pie spice
  1 tsp. nutmeg {I used a little more}
 1 tsp. cloves {I used a little more}
2 teaspoons baking soda
1 teaspoon salt
Pour into a prepared bundt cake pan. I used PAM spray, and sprinkled it with cinnamon sugar.
Bake at 350 for one hour. Test with a toothpick- when it comes out almost clean, it is done. Allow to cool in pan for at least 25 min. Then transfer carefully to a plate. Allow to cool a little more, and add the frosting while it is still warm.

FROSTING:
4 oz. cream cheese (softened) you can use the reduced fat kind
1/2 cup butter or margarine softened
2 tsp. vanilla
4-5 cups powdered sugar
If you want it pumpkin flavored, add 2 TBSP. pumpkin. I cheated, and added some Trader Joe's pumpkin cream cheese that I had. You could probably also use Pumpkin Butter.  I think this would be really good with some orange zest in it.
 
Blend together until light and fluffy. Put on cake while it is still warm, and it will melt a little and drip down on the sides.
This frosting is really good- watch out if you have graham crackers in your house.

 
Enjoy! This was another great pumpkin dessert to add to my ever-growing pumpkin recipe list!
I hope you are enjoying your Fall Season!

post signature

Sunday, November 4, 2012

Easy Pumpkin Ice Cream & Vanilla Pie


**great give-a-way coming tomorrow-- another awesome one for Holiday Cards!**

One of my favorite things we had at Thanksgiving growing up, was Pumpkin Ice Cream Pie! I have been meaning to share it here for years, and today I'll share with you an easy way to make it with a twist. Believe me, this will impress all your friends and family- and even those that might not like pumpkin- may love this!

Pumpkin Ice Cream & Vanilla Pudding Pie {the EASY way}
1 1/2 cups graham crackers
6 TBSP melted butter
1/3 cup sugar
1 tsp. cinnamon (optional)
2-3 cups pumpkin ice cream {This is a seasonal item, you can find in almost any grocery store. I used Trader Joe's brand.}
8 oz. container Cool Whip
1 small package Instant Sugar Free Vanilla Pudding Mix

1. Melt the butter in a 9 inch glass pie pan. I melted mine in the microwave. Crush graham crackers until fine crumbs. I used a small food chopper. Add the graham crackers and sugar, and cinnamon (optional), to the butter. I mixed mine right in the glass pie pan. When well mixed, pat to the bottom and sides to form a pie crust. Chill for about one hour in the freezer.
2. Allow pumpkin ice cream to soften. Scoop out 2 or 3 cups and spread evenly on the pie crust. Allow to chill for at least 1/2 hour.
3. Mix the cool whip and pudding MIX together. Spread evenly on top of the ice cream layer. Freeze for 2-3 hours or longer before serving.

Enjoy! This is fun to add to the "pie fest" for Thanksgiving!

post signature

Sunday, October 21, 2012

Pumpkin Pie Milkshake


Ppst! Great holiday give-a-way coming tomorrow! Come back to enter!
If you are a pumpkin fan, you will love this! I love all things flavored or baked with pumpkin. My  husband and kids said this one is a keeper. We will be making it again!

Pumpkin Pie Milkshake
recipe from Our Best Bites Cookbook

Serves 2-3
1/3 cup pumpkin puree
1/2 cup milk {or a little less}
1/4 tsp. vanilla
1/2 tsp. cinnamon
pinch of cloves
pinch of nutmeg
2 TBSP. brown sugar
2 cups vanilla ice cream
1-2 graham crackers, crushed up
we added- Whipped Cream- to put on top

Combine everything except the graham crackers in the blender. Blend until it looks right to you. Add more milk if you want it a little thinner.When done, pour into glasses, sprinkle graham cracker crumbs on top and top with whipped cream!

This makes a yummy dessert the whole family will love!

post signature


Saturday, September 1, 2012

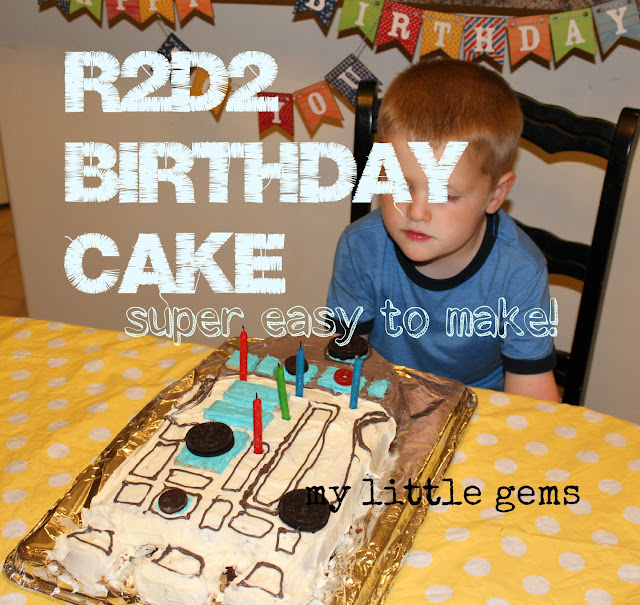
R2D2 Birthday Cake {super easy star wars cake}

I like to make a fun cake for my kid's birthdays. And I let them request whatever they want, and try to make it happen. Most cakes have been easy, or I have found help online. This year my son wanted the Millennium Falcon. I talked him into R2D2 since it was the day of the birthday....and it had to be easy. And so here you go-a super easy R2D2 cake:

I made two cake mixes (I always add things to my cake mixes because I think plain cake mixes are boring...-I think I added some pudding and fat free sour cream...)
I put one cake in two round pans and one cake in a rectangle pan.


  I cut off about one row on the rectangle off the bottom. I cut part of on the side- you can see on the right- and added it back- so don't do that. Just cut about one row off the bottom. Next, cut a little more than 1/2 of a round for the head. Using the other part of the round, cut out 3 feet- rounded type triangle looking pieces. I just looked at a picture of R2D2 and cut. If you do that, you will be good. I did not have room to add the legs- so I drew lines w/ the frosting as seen below.
Once again, looking at a picture of R2D2 Add all those details. I used graham crackers and oreos- mini and regular size- for the details along with frosting and one red lifesaver.
Please ignore the part where I clearly did not have a steady hand when applying the frosting.

And there you have it. I definitely am not a "fancy smancy" cake baker. I have never used fondant. Nor do I want to (it doesn't taste that great)- and I often use a cake mix. The kids don't care. They loved it. They want the same cake next year.They had the best time eating it, and said I was the best mommy ever.  I call that a success.


Thanks for reading!

post signature

Wednesday, August 1, 2012

Olympic Ring Edible Bracelet {Crafting with Kids}

 Several weeks ago, I bought all these round things with holes- in hopes of coming up with some fun Olympic craft. Well....the Olympics are in full swing- so it was time to make a little something. My boys were loud and crazy, until I pulled this stuff out. And they thought I was the best mom- at least for today. And they were quiet for a few minutes. And pleasant. And saying nice things to each other.
That was a nice moment.
We used simple things to make a simple edible bracelet.
I like simple crafts for kids- no prep for me- no fancy stuff- just good and simple fun.

So if you need a simple craft, the calm down the kiddies, and give them something fun to do - have them make one of these- while you watch the Olympics.

Happy Summer!
post signature

Sunday, July 29, 2012

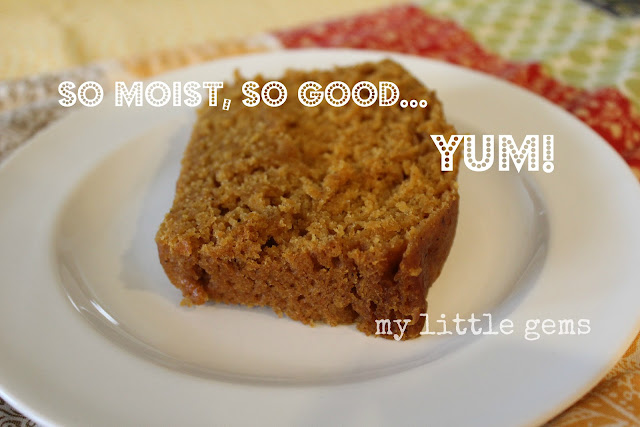
Pumpkin Bread in the Crockpot {Slow-Cooker}

 Pumpkin Bread in the Crockpot...it totally works! I love pumpkin everything- so when I saw this, I had to try it right away. It was really good! It is very moist bread. The recipe is easy and delicious. If you are waiting until Fall for pumpkin baking- pin this- because it will be Fall before we know it!{ I love pumpkin everything- not just in the Fall but all year.}

Crockpot Pumpkin Bread


  • 1/2 cup of oil (I used 1/4 applesauce, and 1/4 canola oil)
  • 1/2 cup of sugar
  • 1/2 cup of packed brown sugar
  • 2 eggs (beaten)
  • 1 can of pumpkin (15 oz can pure pumpkin)
  • 1 1/2 cup of flour (sifted)
  • 1/4 tsp. of salt
  • 1/2 tsp. of cinnamon
  • 1/2 tsp. of nutmeg
  • 1 tsp. of baking soda

  • First, mix the oil and sugars (and applesauce if you use that instead of part of the oil). Add the beaten eggs, and pumpkin. Mix well. Add the dry ingredients and mix well. Spray a regular sized bread pan with baking spray. (I use PAM baking spray.) Pour batter into pan. Now put 2 cups of water in your crockpot/slow cooker. Now carefully place the bread pan into the crockpot. Before placing the lid on, take 8-10 paper towels, and lay them across the top so that they are trapped between the lid and the crockpot. This will help prevent the bread from becoming mushy. Try to trap the paper towels with the lid, so they do not fall into the crockpot. Turn your crockpot on high and cook for 2 1/2-3 hours. Your house will smell wonderful! When finished, the bread will be very soft and moist. Carefully remove from pan, allow to cool and enjoy!

    I think I would definitely use this paper towel method with my other crockpot recipes- like the apple pie in a crockpot, and the caramel apple pie.

    This bread is really good! I would make it again! I do really like my regular recipe - I bake in the oven- it allows for a crispy crust. You will not have a crispy crust with this- but it is still very delicious!

    Enjoy!

    post signature

    Sunday, July 15, 2012

    Banana Yogurt Cake {one year old b'day cake}

    Recently we celebrated a special birthday: a first birthday! This recipe proved to be a hit for the baby and for the entire family. This would be a great cake to make if you have a little one with allergies.
    We had it with cream cheese frosting- which  I'll include in the recipe, although it might be too sweet for little ones. My little one made a yucky face when he tried the frosting, but he ate the cake up and loved it!


    Banana Yogurt Cake:
    1/4 cup unsweetened applesauce {you can use 1/4 cup margarine instead}
    1 cup sugar {you can use 3/4 cup agave instead}
    3 eggs {we used flaxseed as shown here}
    1 tsp. vanilla
    2 cups flour
    1 tsp. baking powder
    1 tsp. baking soda
    3/4 tsp. salt
    1 cup vanilla greek yogurt
    1 cup mashed banana
    Cream sugar and applesauce {or margarine if you choose}. Add the dry ingredients alternating with the yogurt. Mix well. Add banana.
    Bake at 350 for about 20 min. for round cake pans, and 30 min. for a 9 by 13 pan. Watch it carefully since every oven is a little different.
    Cake will be done when inserted toothpick comes out clean. Allow to cool. Frost with cream cheese frosting.

    Cream Cheese Frosting:
    4 oz. cream cheese- softened
    1/4 cup butter -softened
     1 1/2 cups powdered sugar
     1/2 tsp. vanilla
    1/8 tsp. salt
    Combine all ingredients and mix well. Add the sugar in 1/2 cups until you have the desired consistency.  May need to double is frosting a round cake.

     We loved it! Like I said earlier, the frosting was a bit sweet for him, so I just took it off his piece. But he sure loved the cake!
    The rest of the family loved it too- with the frosting. We will be making this cake again!


    Enjoy! Happy Sunday!

    post signature